1) CREATE NEW DOCUMENT AND SETUP A GRID
To create a new document, click File > New or Cntrl+N. Name your file as “Retro Folded Typography”, enter 750px in both width and height options. Click advance button and change color mode to RGB and Screen (72 ppi). Click OK to continue.
To enable the grid, hit View>Show Grid or Cntrl+”
2) CREATE AN ALPHABET ‘A’.
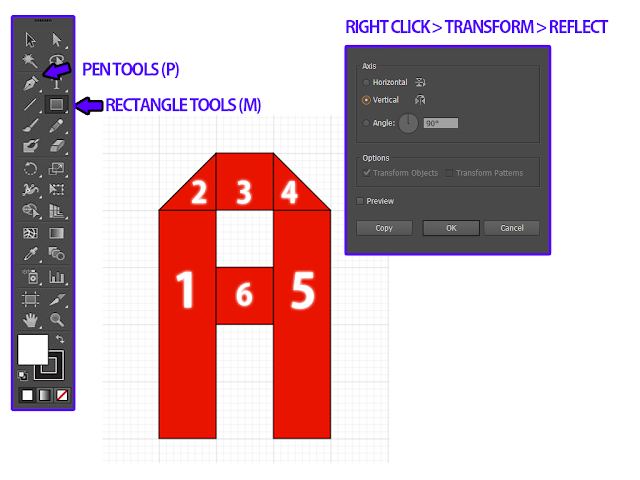
To create alphabet ‘A’, you must follow six steps. To make it easy, you can choose View > Snap to Grid.
1) Drag 28 x 8px in your artboard using Rectangle Tool on the left toolbar or (M).After finishing all six steps. It resulted this. You can select any colors that you like and make sure you remove stroke color.
2) Create half 8x8px triangular shape using Pen Tool (P)
3) Create 8x8px rectangle using Rectangle Tool (M)
4) Follow second steps or duplicate second step shape by Ctrl+D (copy) and Cntrl+F (Duplicate). Rotate the shape by Right Click > Transform > Reflect, click Vertical option, and hit OK.
5) Duplicate shape in step 1.
6) Duplicate step 3.
3) MAKE REALISTIC FOLDS EFFECT.
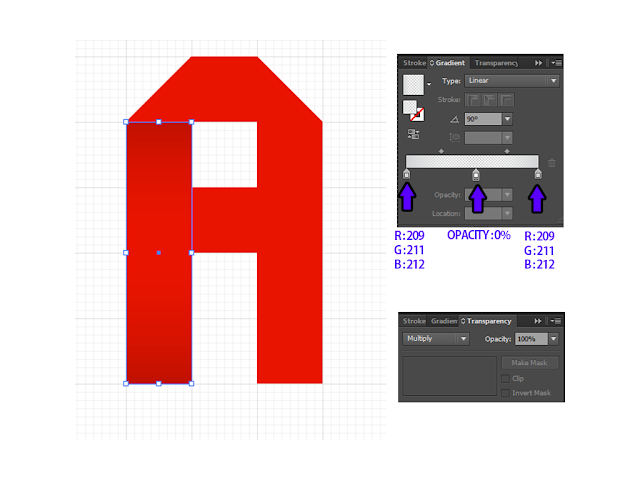
To make realistic folds effect, Duplicate all layers by selecting all shapes that you created by Ctrl+D ( copy ) and Cntrl+F ( Duplicate). Do not group all the shape. Click shape #1 that you have duplicate and apply shadows. To apply shadow click Gradient Icon on the right side toolbar and follow all options below. Then change the blending option in Transparency to Multiply.
Next, Select all top shapes and merge it in one shape by clicking
Pathfinder or Shift+Ctrl+F9. Unite the shape and duplicate that shape. Apply
shadow by clicking Gradient Icon.
Finally, follow all steps below for finishing touch. Take note that the shadow on the right side (28x8px) used the same setup as shape
#1.
And there you have it! Retro Folded Typography. Just only four
steps you can make one easy alphabet. For another alphabet reference, you can look
to this post Retro Folded Typography. That’s all from me! Cheerio
SHARE AND LIKE MY POST!


osem tutorial!! :D
ReplyDeletethanks :)
Delete